If you own a golf cart—gas or electric—you already know it’s more than just a ride. It’s freedom. It’s convenience. It might even be your daily neighborhood cruiser. Either way, a little DIY golf cart maintenance goes a long way in keeping it running smoothly without draining your wallet.
Why Regular Maintenance Matters
Just like a car, your cart needs love. Skipping maintenance leads to breakdowns, costly repairs, shorter battery life, and performance issues. Even if you only use it seasonally, it still needs routine checks.
How Often Should You Maintain a Golf Cart?
A good rule of thumb:
- Light use → every 3–4 months
- Moderate use → every 1–2 months
- Heavy use → monthly checks recommended
- Before winter storage → always!
Essential Tools You’ll Need for DIY Golf Cart Maintenance
Before diving into hands-on work, gather a small toolkit that’ll make your life easier.
Basic Hand Tools
You’ll want:
- Socket wrench set
- Screwdrivers (flat & Phillips)
- Pliers
- Multimeter (for electric carts)
- Tire pressure gauge
Safety Gear & Cleaning Supplies
Stay safe and keep things tidy with:
- Mechanic gloves
- Eye protection
- Shop towels
- Simple Green or cart-safe cleaners
- Battery terminal brush
Step-by-Step DIY Golf Cart Maintenance Checklist
Cleaning & Inspecting the Exterior
A clean cart reveals problems early. Dirt hides cracks, loose bolts, and corrosion.
Do this monthly:
- Hose off dust and mud
- Wipe down seats
- Inspect for cracks in the body
- Tighten any loose hardware
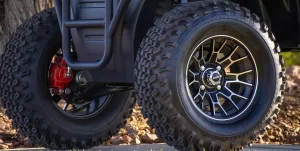
Tire Inspections & Pressure Adjustments
Tires are your cart’s only contact with the ground, so don’t ignore them.
Check monthly:
- Tread depth
- Sidewall cracks
- Tire pressure (usually 15–25 PSI depending on the tire)
Brake System Checks
Spongy brakes? Squeaky pads? Don’t ignore them.
DIY tasks:
- Inspect brake pads
- Check brake drums
- Test the pedal for firmness
- Tighten the cable if needed
Steering & Suspension Checks
Loose steering is dangerous. So is a worn suspension.
Check for:
- Loose steering wheel play
- Worn leaf springs
- Damaged bushings
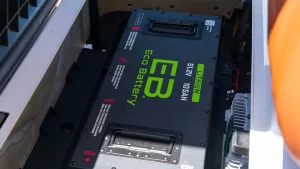
Battery Maintenance (Including golf cart battery replacement)
Your battery is the heart of your electric cart—and sometimes even gas carts use smaller accessory batteries.
Do the following monthly:
- Check terminals for corrosion
- Clean the tops
- Ensure proper water levels (only use distilled water!)
- Make sure your charger is working properly
When to Replace Your Battery
If your cart struggles to climb small inclines, loses charge quickly, or smells like rotten eggs while charging, you might need a golf cart battery replacement.
You can find full service and replacement help here:
👉 Golf Cart Battery Replacement
Electrical System Checks Every Owner Should Do
Wiring Inspections
Look for:
- Melted insulation
- Loose connections
- Exposed copper
- Frayed wires
Testing Lights, Signals & Accessories
Faulty lighting is common—especially after rough rides or winter storage.
Check headlights, taillights, turn signals, and accessory ports.
Seasonal Golf Cart Care Tips
Colorado-Specific Winter Storage Prep (Must-Read!)
Colorado winters are no joke—freezing temps, heavy snow, and dry air can absolutely wreck an unprepared golf cart. So here’s a simple but essential winter prep guide.
Why Colorado Winters Are Tough on Carts
- Freezing temps ruin batteries
- Moisture leads to rust
- Salt and ice melt cause corrosion
- Plastic parts get brittle
Step-by-Step Winter Storage Guide
- Clean the whole cart (inside & out)
- Fully charge the battery
- Disconnect battery cables
- Inflate tires to proper PSI
- Store in a dry, covered space
- Use a golf cart cover
- Check battery charge monthly
- Avoid storing on cold concrete — use boards underneath
When to Call a Professional Instead of DIY
Even the most confident DIYer needs help sometimes.
Signs You Need a Pro Inspection
- Burning smells
- Sudden loss of power
- Grinding or squealing noises
- Electrical systems malfunctioning
- Steering issues
How a Golf Cart Service Department Helps
If you hit a snag, your local golf cart service department is a lifesaver. They handle repairs, diagnostics, upgrades, and full maintenance.
You can get expert help here:
👉 Golf Cart Service Department
How-To: DIY Golf Cart Maintenance
Time needed: 1 hour
This is your quick, no-nonsense walkthrough to handle a full DIY golf cart maintenance session from start to finish. It covers cleaning, inspecting, tightening, testing, and basic battery care — everything a typical owner can safely handle at home.
- Step 1: Gather Your Tools (2–3 minutes)
To get started, gather everything you’ll need, including a tire pressure gauge, a socket wrench set, screwdrivers, a battery terminal brush, distilled water for electric carts, cleaner, shop towels, and proper safety gear. Having these tools ready before you begin makes the entire maintenance process smoother and faster.
- Step 2: Clean the Cart Exterior (5–10 minutes)
Begin by washing away dirt, dust, and debris so you can easily spot any damage or wear. Clean the body panels with a gentle cleaner, wipe the seats and floor mats, and clear out any debris under the seat. A clean cart makes it much easier to identify loose hardware, cracks, or developing mechanical problems.
- Step 3: Check Tire Condition & Pressure (3–5 minutes)
Use your tire pressure gauge to confirm that each tire matches the recommended PSI for your cart model. While checking the pressure, also look for cracks, bald spots, or uneven wear, since damaged tires can affect performance and ride comfort. Maintaining proper tire pressure helps your cart run smoother and protects the suspension.
- Step 4: Inspect Brakes (5–10 minutes)
Take a moment to evaluate the brake system by checking that the pads aren’t thinning and the cables aren’t frayed or overly loose. Make sure the brake pedal feels firm instead of mushy, since a spongy pedal often means the brakes need tightening or attention. Good brake condition is crucial for safe driving.
- Step 5: Tighten Hardware & Check Suspension (5 minutes)
Look over the cart’s hardware, especially around the steering column and suspension, and make sure everything feels secure. Tightening loose bolts reduces rattling and prevents premature wear. As you inspect the suspension components, check that the tie rods, leaf springs, and bushings are solid and free of damage. This ensures a stable ride.
- Step 6: Battery Maintenance (10–15 minutes)
Check the top of the battery for corrosion and clean it thoroughly if needed. Make sure all cable connections are tight, verify water levels if you have an electric cart, and confirm that your charger is working correctly. If the cart loses charge quickly or struggles on hills, you may need a battery replacement, and you can get help here:
👉 https://303cartbarn.com/custom-golf-cart-service/golf-cart-battery-replacement/ - Step 7: Inspect the Electrical System (5–7 minutes)
Look over all visible wiring to make sure nothing is cracked, melted, or frayed. Test the headlights, taillights, turn signals, and any accessories to ensure they turn on without flickering. A quick inspection of the electrical system helps you catch issues before they become major problems.
- Step 8: Perform a Quick Test Drive (5 minutes)
Finish your DIY maintenance by driving the cart for a few minutes to confirm everything feels right. Pay attention to how smoothly it accelerates, how quietly it brakes, and how responsive the steering feels. A quick test drive helps you confirm that all your maintenance steps were effective.
- Step 9: Know When to Bring in the Pros (Optional but Smart)
If you notice burning smells, sudden loss of power, grinding noises, or electrical failures during or after your maintenance routine, it’s a good idea to contact a professional golf cart service department for a detailed inspection. You can reach one here:
👉 https://303cartbarn.com/golf-cart-service-and-maintenance/
Total Estimated Time Recap
| Task | Time |
|---|---|
| Tool Prep | 2–3 min |
| Cleaning | 5–10 min |
| Tires | 3–5 min |
| Brakes | 5–10 min |
| Hardware + Suspension | 5 min |
| Battery Check | 10–15 min |
| Electrical Check | 5–7 min |
| Test Drive | 5 min |
| TOTAL | 45–75 minutes |
DIY Maintenance FAQ
Charge after every use. Letting it drop too low shortens its lifespan.
Yep—just the tops. Use a mixture of baking soda and water to clean corrosion.
Yes, but batteries are heavy and require careful handling. If unsure, use a pro service.
Most are between 15–25 PSI. Check the sidewall to be sure.
Not recommended in Colorado. Extreme cold kills batteries fast.
If it won’t reach full charge or shuts off too early, it may need repair.